

Epoxy Resin Casting Guide for Stunning Home Décor
- Nima
- Jan 22
- 18 min read

Choosing the perfect epoxy resin can seem confusing when you first start dreaming up custom home décor pieces. Every Canadian and American beginner has faced the shelves of supplies and wondered which bottle creates that crystal-clear shine or lasting durability. Selecting the right epoxy resin and essential safety supplies is your foundation for a successful project, helping you avoid sticky disasters and achieve professional-level results right from your own workspace.
Table of Contents
Quick Summary
Main Insight | Clear Explanation |
1. Choose the Right Resin Type | Identify the best epoxy resin for your project to ensure optimal results and curing properties. |
2. Prepare Your Workspace Effectively | Set up a clean, temperature-controlled area to prevent issues during the resin pouring process. |
3. Mix Resin Accurately and Safely | Follow precise ratios and safety protocols when mixing resin to ensure proper curing and reduce health risks. |
4. Pour with Deliberate Technique | Use a controlled pouring method to minimize bubbles and achieve a smooth, even surface in your project. |
5. Perform Quality Checks After Curing | Inspect your finished piece for any imperfections and ensure it meets your desired standards before display. |
Step 1: Choose the Right Epoxy Resin and Supplies
Before you pour a single drop of resin, you need to understand what you’re working with. The resin you select will determine everything from how your finished piece looks to how long it takes to cure. Getting this right means your home décor projects will turn out beautifully instead of ending up in a disappointing pile of sticky mishaps.
Start by identifying your specific project. Are you making a river table epoxy pour, a resin coaster set, or decorative home accents? The answer matters because not all epoxy resins work the same way. Some are formulated for self-leveling, which creates that gorgeous glossy surface without much effort. Others require a bit more finesse but offer superior hardness and UV resistance. When selecting epoxy resins for your application, consider factors like curing time, flexibility, and heat resistance. A resin that cures in four hours might work perfectly for a quick jewelry project but will stress you out if you need longer working time for a large countertop pour.
Next, gather your complete supply kit. Beyond the resin itself, you’ll need a hardener or curing agent, which are designed to work together as a system. Mixing mismatched resins and hardeners is like trying to bake a cake with the wrong amounts of ingredients. Your safety supplies matter just as much as the resin itself. Invest in nitrile gloves, a respirator mask rated for volatile organic compounds, and eye protection. You’ll also need measuring cups specifically designated for resin, mixing sticks, heat guns or torches for degassing, and molds appropriate for your project size. If you’re working on larger pieces, epoxy resin kits designed for artworks and crafts come with many of these essentials already included, which saves you from buying things piecemeal and ensures your resin and hardener are perfectly matched.
Pay attention to the resin’s working time and pot life. Working time is how long you have to pour and manipulate your resin after mixing. Pot life is when the mixture becomes too thick to work with. If the working time is only 20 minutes and you’re making a detailed pour, you’ll be rushing. Longer working times of 45 minutes to an hour give you the breathing room to add colorants, position inclusions, and create the details you want. Also check the cure time. Some resins are fully cured in 24 hours, while others take a week. This affects when you can demolding and handle your finished piece.
Consider your space and environmental factors. Epoxy works best in temperatures between 70 and 85 degrees Fahrenheit. Humidity also plays a role, so avoid extremely damp environments. If you’re working in a cold garage during winter, your resin will cure slower and may not set properly. Think about ventilation too. Even though modern epoxy resins produce fewer fumes than older versions, you still want good airflow to keep yourself comfortable and safe during the entire process.
One more critical consideration is UV resistance. If your finished piece will sit near a window or outdoors, standard clear epoxy will yellow over time when exposed to sunlight. UV-resistant epoxy costs a bit more but protects your work from that unwanted color shift. This matters especially for home décor pieces that will be displayed prominently.
Here’s a comparison of common epoxy resin types for home décor projects:
Resin Type | Best For | Working Time | UV Resistance |
Self-Leveling | Coasters, Artworks | 30-45 minutes | Low (may yellow over time) |
Deep Pour | River tables, molds | 1-2 hours | Moderate |
UV-Resistant | Outdoor, windows | 30-60 minutes | High (minimal yellowing) |
Quick Cure | Jewelry, small items | 10-20 minutes | Low |
Pro tip: Start with a mid-range epoxy kit that includes pre-measured amounts of resin and hardener rather than buying bulk supplies for your first projects. This removes guesswork from mixing ratios and lets you focus on learning proper pouring and finishing techniques before investing in larger quantities.
Step 2: Prepare Your Workspace and Mold
Your workspace setup makes the difference between a smooth pouring session and a chaotic cleanup nightmare. Taking time to prepare everything before you mix your resin means you can focus on the actual creative work instead of scrambling for supplies or dealing with preventable mistakes.
Start by designating a dedicated pouring area that you can leave undisturbed for at least 24 hours. Epoxy needs stable conditions to cure properly, so choose a spot away from high traffic areas, pets, and children. A garage workbench, basement table, or even a dedicated corner of your craft room works well. Cover your work surface with disposable materials like kraft paper, plastic sheeting, or old cardboard. Resin spills happen, and protecting your table from sticky drips saves you from permanent damage. If you’re working on a small project, a shallow plastic tray or baking sheet underneath your mold catches overflow and keeps your surface clean.
Temperature control matters more than most beginners realize. Ideally, your workspace should stay between 70 and 85 degrees Fahrenheit while your piece cures. Cold temperatures slow down the curing process and can lead to incomplete hardening or a tacky surface. If you’re working in a cool environment, use a space heater to warm the area, but keep it at a safe distance from your resin. Humidity also affects your results, so avoid extremely damp spaces. If you live somewhere humid, a dehumidifier in your workspace prevents moisture from getting trapped in your resin, which can create cloudy spots or a dull finish.
Now prepare your mold. Start by inspecting it carefully for any damage, cracks, or leftover residue from previous projects. A mold with cracks will leak resin everywhere, so test it first by filling it with water and watching for leaks before you commit your expensive resin. If your mold is new, wash it thoroughly with warm soapy water and dry it completely. Any moisture or soap film inside the mold will create imperfections in your finished piece. For silicone molds, a light coating of mold release spray makes demolding easier later. For rigid plastic or wooden molds, mold release is less critical but still helpful. Apply it sparingly and wipe away excess to avoid getting it into your resin.
Positioning your mold correctly prevents disasters. Make sure it sits on a completely level surface. If your mold tips even slightly, your pour will cure uneven and one side might be thicker than the other. Use shims or small wedges to level it if needed. If you’re working with open molds, consider supporting the sides with painter’s tape or temporary barriers so the mold doesn’t accidentally tip during the pouring process. For larger pieces, some artists build wooden frames around their molds to keep them stable and supported. When you understand proper application techniques for your specific resin type, you’ll recognize how critical stable, level positioning truly is to achieving professional results.
Gather all your supplies within arm’s reach before mixing resin. You need your measuring cups, mixing sticks, colorants, additives, torch or heat gun, and any inclusions you want to add. Having everything organized and accessible means you won’t be hunting for supplies while your mixed resin is sitting in the pot. Set up paper towels or rags nearby for quick cleanups. Prepare your respirator, gloves, and eye protection so you can put them on immediately before mixing. Don’t wait until you’re already pouring to realize you can’t find your safety gear.
Pro tip: Place a piece of painter’s tape around the inside edges of your mold about half an inch below the rim. This tape prevents resin from sticking to the mold’s lip, making demolding cleaner and faster when your piece has fully cured.
Use this quick reference for workspace preparation essentials:
Preparation Step | Purpose | Recommended Items |
Surface Protection | Prevent damage & stains | Kraft paper, plastic, cardboard |
Temperature Control | Ensure proper curing | Space heater, thermometer |
Humidity Management | Avoid cloudy resin | Dehumidifier, hygrometer |
Mold Inspection | Prevent leaks & defects | Water test, mold release spray |
Step 3: Mix Epoxy Resin Safely and Accurately
Mixing epoxy resin correctly is where many beginner projects fall apart. Getting the ratio wrong, mixing too fast, or skipping safety precautions leads to resin that won’t cure properly, looks cloudy, or smells toxic. This step determines whether your finished piece will be crystal clear and rock hard or a disappointing, sticky mess.
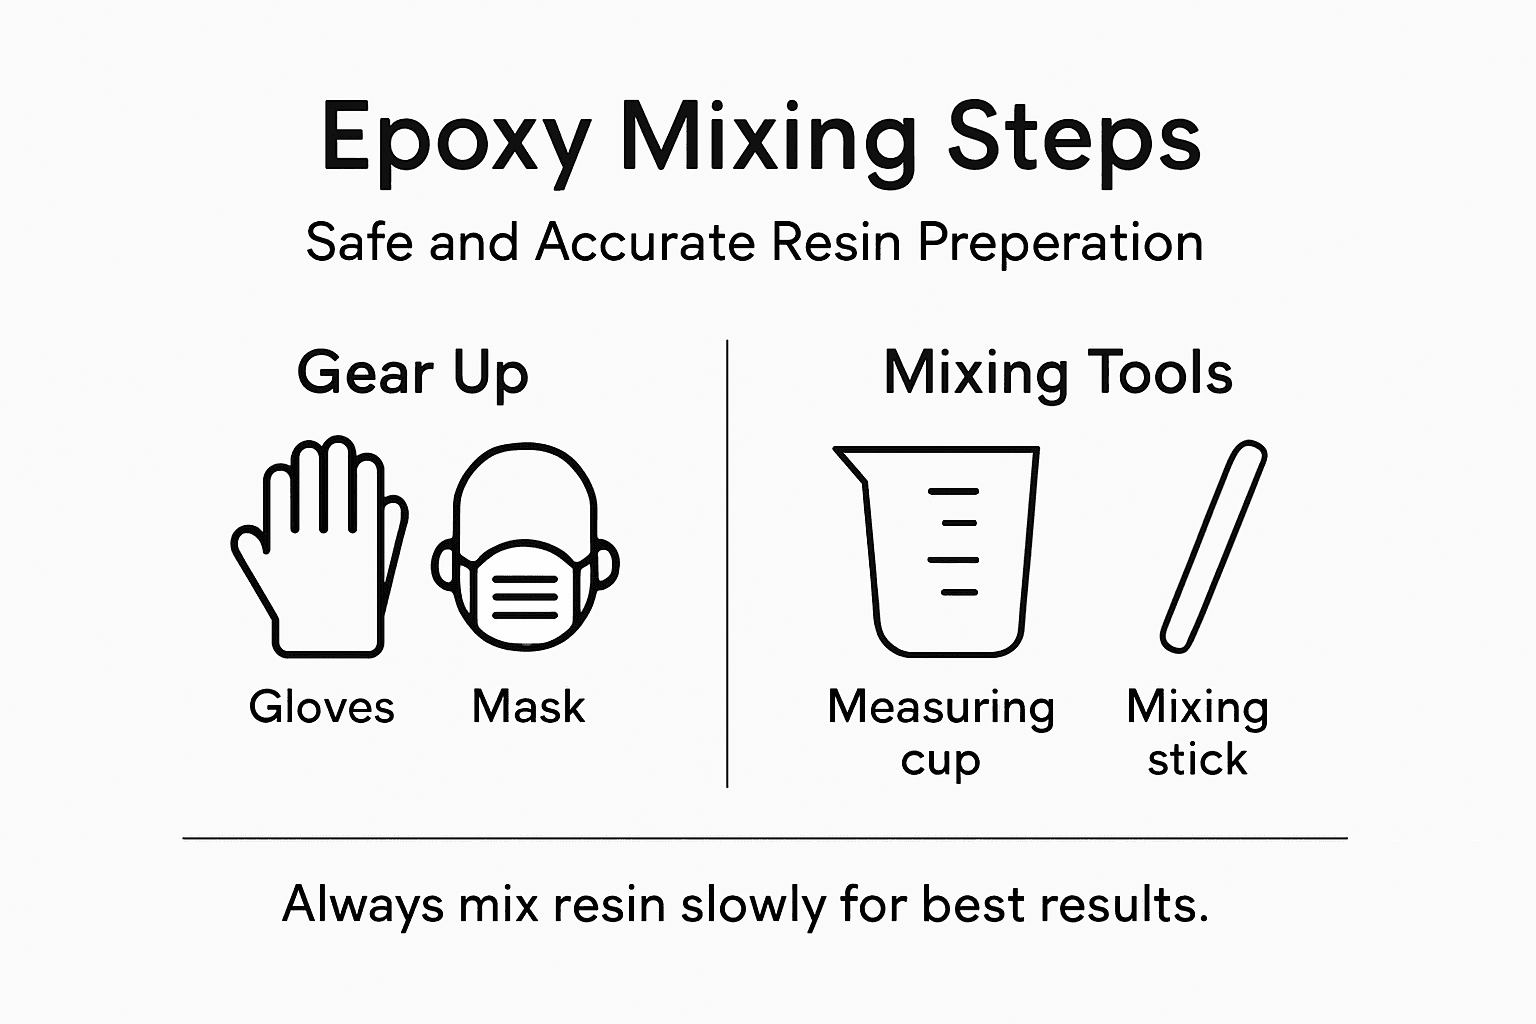
Start by putting on your safety gear before you even touch your resin. Wear nitrile gloves, your respirator mask rated for volatile organic compounds, and eye protection. This isn’t optional. Epoxy fumes can irritate your respiratory system, and getting resin on your skin causes irritation. Work in a well ventilated space, ideally with a window open or a fan running. If you’re indoors without great ventilation, consider moving your mixing station closer to a door or window. Now measure your resin and hardener precisely. This is non negotiable. Use a measuring cup specifically designated for resin work, never one you use for food. Follow your manufacturer’s instructions exactly regarding the ratio. If the instructions say 2 parts resin to 1 part hardener, measure it that way. Eyeballing it or assuming close enough will ruin your project. Thorough and accurate mixing of resin components ensures your epoxy cures with the strength and durability you expect from your finished piece.
Pour both components into your mixing container. Use a container that you’ll discard afterward, never anything you plan to reuse for food or drink. Stir slowly and deliberately for at least 3 to 5 minutes. Slow mixing is key because fast stirring traps air bubbles into your resin, and those bubbles ruin the clarity of your finished piece. Scrape the sides and bottom of the container frequently to ensure the resin and hardener blend completely. Any unmixed pockets of pure hardener or pure resin will cure improperly and create weak spots in your work. You want a uniform color throughout, with no streaks or swirls. If your resin is thick or you’re working in a cold environment, it may take longer to mix thoroughly. Be patient. Rushing this step costs you time later.
After mixing, let your resin sit for a few minutes before pouring. This resting period allows any bubbles you’ve introduced during mixing to rise to the surface. If you’re planning to use a heat gun or torch to pop bubbles later anyway, this step matters less. But if you want to minimize bubble work, this pause gives nature a little help. Some resins have a pot life of only 20 minutes before they become too thick to pour, so check your specific product’s timing. You don’t have unlimited time once you’ve mixed, so don’t get distracted. Have your mold ready and prepared before you start mixing. The moment you mix your resin and hardener, the clock starts ticking.
If you’re adding colorants or other additives, add them after mixing your base resin and hardener. Stir them in gently and thoroughly. Some colorants are thicker than others, and you want them evenly distributed throughout your mixture. Adding colorants after the initial mix prevents you from accidentally over stirring the main components and introducing more bubbles than necessary. Keep a timer running so you know how much working time remains. After about half your pot life has passed, your resin will start thickening noticeably. This is your signal to wrap up pouring and positioning inclusions before the resin becomes too viscous to work with.
Pro tip: Mix your resin in a tall, narrow container rather than a wide, shallow one. The taller sides help bubbles rise more efficiently and give you better visibility to spot any unmixed areas at the bottom of the container.
Step 4: Pour and Layer Resin for Best Results
Pouring your mixed resin is where the magic happens, but technique matters more than you might think. A careless pour creates bubbles, uneven surfaces, and finished pieces that look amateur. Learning to pour deliberately and strategically transforms your results from okay to stunning.
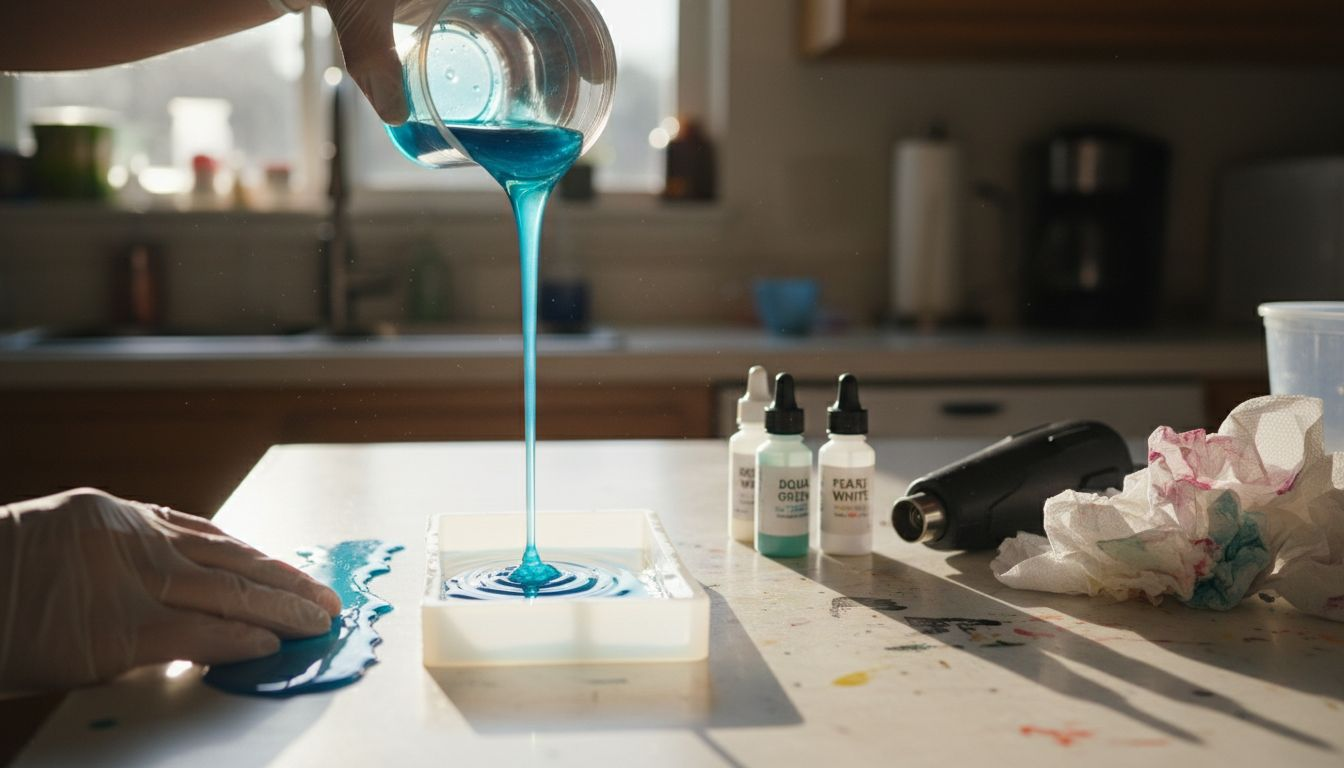
Start by pouring your mixed resin slowly and steadily into your mold. Resist the urge to rush. Pour from a height of about 6 to 12 inches, depending on your mold size and resin viscosity. A slow, controlled pour from a moderate height prevents splashing and reduces bubble formation. If you’re working with a large mold or heavy pour, you might pour in stages rather than all at once. Pouring part of the resin, letting it settle for a minute, then pouring the remainder prevents overfill and gives air bubbles time to escape naturally. Watch your resin level as you pour. Stop when you reach your desired height, leaving enough space so the resin doesn’t overflow when you add inclusions or if it expands slightly during curing.
Now comes the bubble management phase. Grab your heat gun or torch and move it slowly across the surface of your poured resin. Hold it about 4 to 6 inches above the surface. The heat causes surface tension to break and allows bubbles to pop and escape. Move deliberately and don’t linger in one spot too long, or you’ll create a hot spot that can damage your mold. You’ll see bubbles rising to the surface and popping as the heat does its work. This process usually takes a minute or two depending on how many bubbles you have. Some artists prefer using a heat gun on low setting for better control, while others like the speed of a torch. Experiment to find what works for you. If you notice a stubborn bubble that won’t pop with heat, use a toothpick to puncture it carefully from the side, but this is a last resort solution.
If you’re creating a layered resin piece with different colors or effects, timing is everything. Let your first layer cure slightly before pouring your second layer. How long? Check your resin’s specifications, but typically you want the first layer to be tacky but not fully cured, usually 4 to 8 hours depending on the brand and conditions. This tackiness helps the next layer bond to it. If you wait until the first layer is completely hard, your second layer might not adhere properly and could peel away later. When you’re ready to pour the second layer, mix fresh resin if needed, add any new colorants, and pour it over the first layer using the same slow, deliberate technique. The beauty of layering is that you can create depth, dimension, and complex color effects that single pour pieces cannot achieve.
For multi layer projects with inclusions like dried flowers, glitter, or metallic flakes, place your first inclusion layer right after pouring your base color. Let that layer cure to the tacky stage, then position your inclusions carefully on top. Pour your second layer over them. This technique keeps inclusions suspended between layers rather than sinking to the bottom. Some artists use toothpicks to position inclusions exactly where they want them. Work gently because sudden movements disturb the resin and create bubbles or cause inclusions to shift.
When you’ve finished pouring and bubble removal, resist the temptation to touch your work. Place your completed mold in your prepared curing space and leave it alone. Vibrations, movement, and temperature fluctuations during curing create imperfections. Your resin needs undisturbed time to cure properly. With carefully selected epoxy resin products formulated for artworks, you can achieve professional results that justify the patience you invest in proper curing conditions.
Pro tip: If you notice you’ve created too many bubbles while pouring, don’t panic. Let your resin sit for 10 minutes before using your heat tool. Sometimes bubbles rise and pop on their own, and premature heat application can trap them deeper into the resin.
Step 5: Demold and Finish Your Project
Your resin has cured, and now comes the moment of truth. Demolding is when you finally see your finished piece and discover whether all your careful work paid off. This step requires patience and care because rushing can crack your piece or damage the mold you might want to use again.
First, confirm your resin is fully cured. Check your product specifications for the exact curing time. Most epoxy resins cure completely within 24 to 48 hours, but some take longer. Cured resin should feel hard and solid throughout, not tacky or soft in any spots. If you press your fingernail against it and leave an impression, it needs more time. Patience now prevents disappointment later. Once you’re confident it’s fully cured, look for the edges of your piece inside the mold. For silicone molds, gently flex the mold to loosen the piece. Work your fingers around the edges and slowly peel the mold away. This feels satisfying as your finished piece emerges. For rigid molds like plastic or wood, you might need to run a thin plastic tool or knife around the edges to break the seal. Work slowly and carefully. If the piece won’t budge, resist the urge to force it. Instead, let it sit for another 12 hours. Sometimes extended curing helps release stubborn pieces.
Once your piece is out of the mold, inspect it for any imperfections. Small bubbles on the surface are common and can be addressed. If you see surface bubbles, sand them smooth using fine grit sandpaper, starting with 220 grit and progressing to 400 grit for a finer finish. Sand in circular motions with light pressure. If the bubbles are deep, you might need 150 grit to start, but work gradually to avoid over sanding. After sanding, wipe away dust with a damp cloth and let it dry completely. For a glossy finish on your sanded areas, apply a thin coat of resin or epoxy coating designed for finishing. This restores that beautiful shine and creates an even appearance across your entire piece.
Now comes the finishing work that transforms a good piece into a gallery worthy one. If your project is a coaster, cutting board, or anything that sits on a surface, sand the bottom smooth so it doesn’t scratch furniture. Use 220 grit sandpaper for this. If you want the bottom to feel extra smooth and luxurious, progress to 400 grit. For pieces with edges that will be visible, like resin jewelry or wall art, sand all visible edges gently to remove any sharp spots or rough areas. Your fingers will thank you, and your piece will feel more professional.
Consider adding a final protective layer. A clear epoxy topcoat or UV resistant resin coating protects your finished piece from dust, minor scratches, and yellowing over time. This is especially important if your piece will be displayed in a sunny location or used regularly. Apply the coating following the product instructions, usually with a brush or by pouring, depending on the product. Some artists skip this step for pieces that will sit indoors away from sunlight, but it’s worth doing for pieces that will see regular handling or sun exposure.
Displaying your finished work means choosing the right location. Resin pieces look stunning on shelves, desks, or as wall art. Place them where you can see them and enjoy your accomplishment. Protect your piece from extreme temperature fluctuations, which can cause it to expand and contract. Avoid placing resin items directly in intense sunlight if they’re not UV protected, as they’ll yellow over time. Keep them away from heat sources like radiators or vents. With proper placement and occasional dusting, your handmade resin home décor will stay beautiful for years.
Pro tip: Before demolding, mark the top of your finished piece with a small piece of tape. This prevents confusion if you’re working on multiple pieces, and it helps you remember which side should face out for display.
Step 6: Inspect and Ensure Professional Quality
The difference between a homemade piece and a professional one comes down to quality inspection. Taking time to thoroughly examine your finished resin work catches imperfections and ensures your project meets the standards you set for yourself. This final quality check transforms good work into something you’re genuinely proud to display or gift.
Start by examining your piece under bright, natural light. Artificial lighting can hide imperfections or create shadows that obscure flaws. Look at the entire surface from multiple angles. Check for cloudiness, which usually indicates trapped moisture or incomplete curing. If you see cloudy areas, your resin may need additional curing time or your mixing ratio was incorrect. Look for any streaking or color inconsistency, especially if you mixed in colorants. Streaking means your colorant wasn’t fully blended during mixing. For future projects, remember to stir longer and more deliberately. Inspect the edges and corners where resin pools. These areas sometimes cure differently and may feel slightly softer or look less glossy than the main surface. If edges are significantly softer, your piece needs more curing time before you consider it complete.
Check for surface imperfections like bubbles, dust particles, or small cracks. Small surface bubbles are purely cosmetic and can be sanded smooth with fine grit sandpaper, which you’ve already learned about. Dust particles trapped in the resin during curing are trickier. If they’re on the surface, you might sand them away, but if they’re embedded deep inside, you’ll need to accept them as part of the learning process. Small cracks usually indicate temperature fluctuations during curing or uneven support of the mold. These are structural concerns and make the piece unsuitable for functional use, though they can work for decorative pieces. For your next project, ensure more stable temperature control and level mold support. Understanding standardized quality assessment methods for epoxy resins helps you evaluate whether your resin system performed as expected and where environmental or mixing factors may have affected results.
Now assess the hardness and durability of your piece. Press your fingernail firmly against an inconspicuous spot. There should be zero impression. If you leave any mark at all, your piece needs more time to fully cure. Hardness directly affects how well your finished piece will hold up to handling and display. If your piece is meant to be used as a coaster or functional item, full hardness is non negotiable. For decorative pieces that will sit undisturbed on a shelf, minor softness is more forgivable, but you still want maximum hardness for longevity.
Evaluate the overall finish and appearance. Does the surface feel smooth when you run your hand over it? Are there any rough spots or sharp edges? Does it catch light evenly, or are there dull spots? These observations tell you whether your demolding and finishing work was successful. A professional looking piece should have a uniform, glossy appearance and smooth texture throughout. If you notice visual control techniques like detecting streaking can help you understand whether your mixing and pouring technique produced consistent results. Uneven coloring or visible mixing lines indicate you need to stir longer next time.
If your piece passes all these inspections, congratulations. You’ve successfully created a professional quality resin project. If you notice issues, don’t be discouraged. Each project teaches you something. Document what went wrong and what you’ll do differently next time. This iterative learning process is how artists improve their craft. Compare this piece to photos of professional resin work you admire. What differences do you notice? What would elevate your piece to that level? These observations guide your next project toward better results.
Pro tip: Keep a notebook documenting each project including the resin brand, cure time, temperature, humidity level, and any issues you encountered. Over time, you’ll build a personal reference guide that helps you identify patterns and continuously improve your technique.
Elevate Your Epoxy Resin Home Décor Projects with Krystal Resin
Creating stunning resin pieces requires more than just enthusiasm. The challenges of selecting the right epoxy resin, managing working and curing times, and preparing your workspace are real obstacles standing between you and flawless results. From avoiding sticky mishaps to achieving professional-quality finishes, your success depends on having the perfect materials and tools crafted specifically for your creative needs.

Unlock your full resin art potential today by exploring our expertly curated range of epoxy resins and craft supplies at Krystal Resin. Whether you need UV-resistant resins for long-lasting clarity or complete resin kits designed to simplify mixing and pouring, we offer dependable products that match your project requirements. Don’t let uncertainty slow your progress. Visit Krystal Resin now to browse high-quality resins, molds, colorants, and everything else needed to turn your vision into reality with confidence and ease.
Frequently Asked Questions
What type of epoxy resin should I use for home décor projects?
To achieve stunning results in home décor projects, choose an epoxy resin that fits your specific project needs. For example, if you are creating a river table, look for deep pour epoxy, while a self-leveling resin is great for coasters.
How do I prepare my workspace for epoxy resin casting?
Preparing your workspace involves designating a clean area free from spills and dust, ideally at a temperature between 70 and 85 degrees Fahrenheit. Set up protective coverings and ensure all necessary supplies are within reach to streamline your process.
How long does it take for epoxy resin to cure?
Cure times vary by resin type, but most epoxy resins fully cure within 24 to 48 hours. Be patient during this time and avoid handling your piece to ensure it sets properly.
How can I prevent bubbles from forming in my epoxy resin?
To minimize bubble formation, mix your epoxy slowly and allow it to sit for a few minutes after mixing. Utilize a heat gun or torch to gently pass over the surface after pouring to help bubbles rise and pop.
What should I do if my finished piece has imperfections?
If your piece has small bubbles or surface imperfections, you can sand them down using fine-grit sandpaper. For significant issues, you might need to apply a thin layer of clear epoxy to restore its glossy finish.
How can I ensure my epoxy resin project is UV resistant?
To protect your project from yellowing due to sunlight exposure, choose a UV-resistant epoxy resin formulated for outdoor use or pieces displayed near windows. Applying a UV-resistant topcoat can enhance protection as well.
Recommended